Backflow Preventer Enclosure Installation Guide

Backflow Preventer Enclosure Installation Guide
Jump To Topic

This guide is written for civil and plumbing engineers, water authority specifiers, facility managers and installing contractors. It covers which location is best, how to select and size a backflow preventer enclosure, and the step-by-step process for a compliant, lasting installation grounded in ASSE 1060 requirements and field-tested best practices.

Where Should a Backflow Preventer Be Installed?

Outside and above-ground within an ASSE 1060-certified enclosure. This is the safest, most code-compliant and most cost-effective method. Two common alternatives — underground vaults and indoor mechanical rooms — create the very problems backflow prevention is designed to prevent.

Don’t Install a Backflow Preventer in These Two Places — Here’s Why

It's not advised to install backflow prevention assemblies in underground vaults or inside buildings. Here are the reasons why you should choose an above-ground enclosure instead.

Vault

Underground Vaults Create the Problems They’re Supposed To Prevent

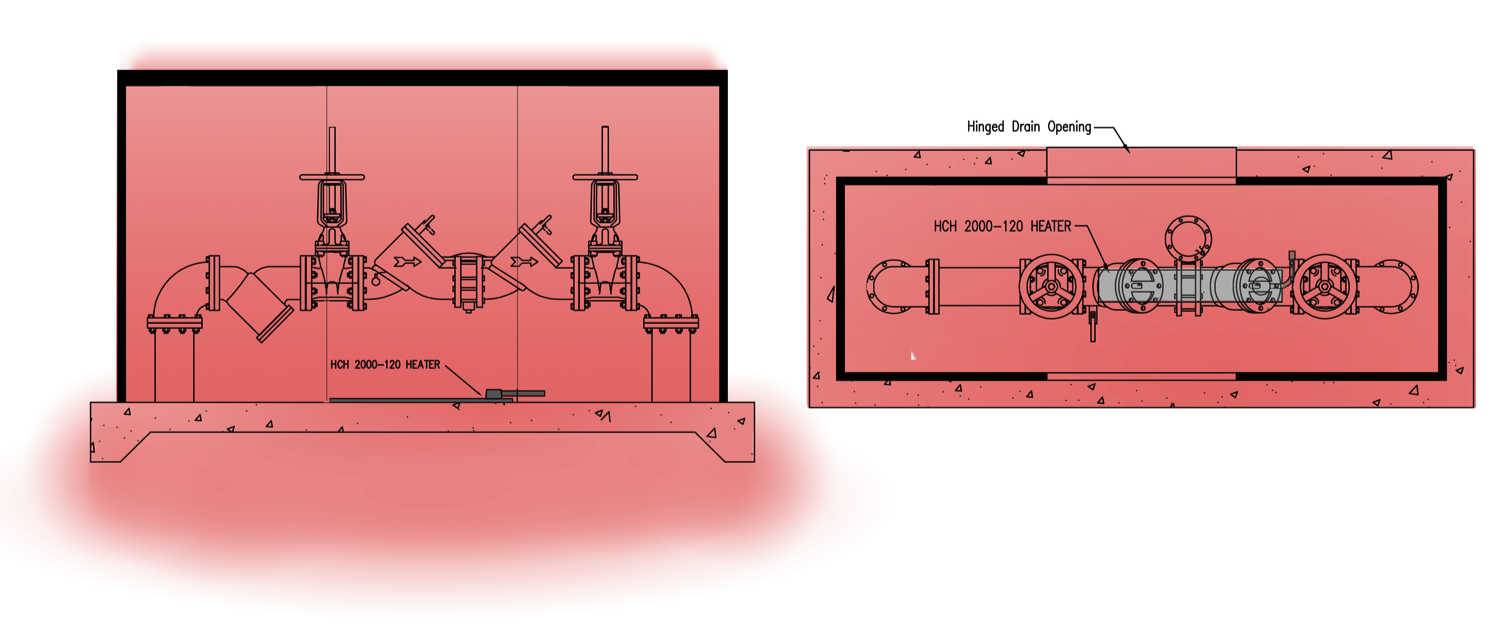
Subterranean utility vaults are a legacy installation method with a well-documented record of failure. The USC Foundation for Cross-Connection Control and Hydraulic Research updated its guidance in 2016, urging water utilities to avoid installing assemblies in subterranean vaults. The reasons are structural.

Vaults flood, and flooding creates the cross-connection they’re built to prevent.

When a vault fills with water, submerged test cocks create a direct pathway for contaminated drinking water to enter the potable water supply. Whether those test cocks are open or closed doesn't matter. The submersion itself is the cross-connection — a significant threat to public health. In a poll of engineers and water jurisdictions conducted by Safe-T-Cover, 70 percent confirmed they know vaults flood.

Vaults are also an OSHA-defined confined space. Every annual test requires a certified tester to enter that confined space. According to the National Institute for Occupational Safety and Health, 92 fatal injuries occur in confined spaces each year. Beyond the tester, the vault lid offers little barrier to anyone else who decides to open it.

Vault drawbacks include:

  • RPZ assemblies cannot be installed below-grade — a code requirement that eliminates vaults for the most common commercial assembly type
  • Higher installation and long-term rehab costs compared to above-ground enclosures
  • Poor accessibility due to limited internal space
  • Toxic gas accumulation, flooding and animal intrusion create ongoing safety hazards
  • Numerous municipalities (for example, Las Vegas) have prohibited vault installations outright

Indoor Installation: The RPZ Flood Risk

Installing backflow preventers inside a mechanical room or building is a common workaround, particularly for RPZ assemblies, which cannot go below grade. However, most building owners and their insurers are unaware of the flood exposure this creates.

Supply pressure and assembly size together determine discharge volume, and an RPZ malfunction can discharge more than 375 gallons of water per minute. Typical floor drains aren't sized to handle that volume.

An RPZ discharge event inside a mechanical room resulted in over $1 million in structural damage at a hospital, with water volume sufficient to push a wall into an adjacent telephone and low-voltage wiring room. The property insurer sought recovery damages from the engineer, architect, contractor and most recent tester.

flooded

Backflow manufacturers publish relief valve discharge rates for their RPZ product lines. The most common way designers plan for that water discharge is with drains. But in order to properly dispel all that water, you'd need either many drains or very large ones. This comes with one big problem: cost.

"The floor drain capacity of RPZs of 3" diameter and higher are likely to be cost prohibitive due to necessary pipe diameter and fall rates," said David E. DeBord, former Technical Director of Plumbing and Fire Protection Engineers at dbHMS at an American Society of Plumbing Engineers of Chicago chapter meeting.

Above-Ground Outdoor Enclosures: The Safest Option

Above-ground installation in an ASSE 1060-certified enclosure eliminates the risks of vaults and indoor locations. Maintenance personnel can access critical equipment without special safety protocols, and the relief valve can discharge safely outside. When the outdoor enclosure is properly designed, the assembly is protected from freeze damage, vandalism and environmental damage for decades.

Here's the case for above-ground enclosures, by the numbers:

  • Above-ground enclosure installations get approved approximately twice as fast as underground vaults on average.
  • Las Vegas Valley Water District saved $60,000 per installation by eliminating vault rehabs.
  • Enclosure lengths and cost can be reduced when using N-pattern assemblies. For example, a six-inch N-pattern assembly has a lay length 25 percent shorter than a traditional straight-line model.
covers

How To Choose the Right Backflow Enclosure To Install

Specifying the wrong enclosure is as consequential as choosing the wrong installation location. Material, ASSE 1060 class, size and clearance all determine whether the enclosure protects equipment and how it performs over its service life.

ASSE 1060 Certification: What It Requires and Why It Matters

The American Society of Sanitary Engineering introduced ASSE 1060 in 1996 to regulate backflow enclosure performance. It has been updated several times, most recently in 2017. Only enclosures that pass testing at an ASSE-approved lab receive certification. Most plumbing codes and local plumbing codes now require ASSE 1060 compliance explicitly, and all water jurisdictions should. Regulatory compliance starts with the enclosure specification.

ASSE 1060 sets minimum performance thresholds across five critical categories:

  • Structural load: Must withstand a minimum vertical load of 100 psf

  • Drainage capacity: Must prevent equipment submersion during full RPZ discharge. Minimum drainage by valve diameter:

    1/4 – 1/2" = 27 GPM
    3/4 – 1" = 45 GPM
    1-1/4 – 2" = 155 GPM
    2-1/2 – 3" = 260 GPM
    4” and above = 710 GPM

  • Access and testing: All test cocks and valve handles must be within 24 inches of the access opening; hinged panels must be restrained in open and closed positions; unrestrained panels must weigh 70 lbs or less

  • Security: Access must be lockable via keyed device or padlock-capable hardware 

  • Freeze protection (Class I): Must maintain a minimum internal temperature of 40°F when the external temperature reaches -30°F; minimum R-value of 8.0

ASSE 1060 Class I or Class II: Which Is Right for Me?

Three classes of ASSE 1060 enclosures exist, each providing a different level of temperature control and thermal protection.

Recommendation: Even in traditionally warm regions, a Class I heated enclosure is the best specification. Temperature extremes in Florida, Texas and Arizona have caused widespread assembly failures in jurisdictions that assumed Class II or Class III was sufficient.

About ASSE 1060 Classes

Class
Best For
Features
Class I
Freeze Protection (Heated)
Maintains 40°F minimum internal temperature at -30°F ambient. Includes a built-in heater and a minimum R-value of 8.0. The correct choice for any climate with freeze risk.
Class II
Minimal Freeze Protection
May or may not include a heater. Maintains 40°F for a 24-hour period with a minimum R-value of 8.0.
Class III
No Freeze Protection
No heater, no R-value requirement.

Enclosure Materials: How Aluminum, Fiberglass and Metal Cages Compare

Select the enclosure material before finalizing a specification. Each of these different materials carries distinct performance, compliance and lifecycle cost implications.

Marine-Grade Aluminum
Fiberglass
Metal Cage
Polyethylene / Plastic
ASSE 1060 Certified
Yes
Varies
No
No
Freeze Protection
Available on all models
Available on select standard models only
None
None
Vandalism / Theft Resistance
LOK-360 tamper-resistant lock
Basic lock, minimal deterrent
None; advertises equipment
Low
Corrosion Resistance
Excellent; marine-grade 5052-H32 aluminum with PAC-CLAD finish
Moderate; gelcoat degrades in UV
Low; no corrosion protection
Low; degrades under UV/heat
Typical Service Life
30+ years
Varies
Varies
Short; warps and cracks under UV/heat
Custom Sizing
Yes; modular panels
Limited
No
No
Color Options
Yes; PAC-CLAD finish in standard and custom colors
Typically off-white
Green or gray
No
Upfront Cost
Competitive with fiberglass when lifecycle cost is considered
Moderate
Low
Lowest
Best For
All applications
Not recommended
Not recommended
Not recommended

covers materials (3)


Enclosure Sizing and Clearance Requirements

ASSE 1060 requires that all test cocks and shutoff valves be within 24 inches of the access opening and that equipment inside the enclosure remains accessible for maintenance and testing without removing the entire structure. Adequate clearance is a certification requirement. Field experience and our free Standard Details Guide define the following working clearances:

  • Assembly-to-wall clearance: 6-12 inches on all sides to allow test equipment connection to test cocks
  • Below the RPZ relief valve: 12 inches minimum from relief valve to concrete pad to prevent submersion and allow drainage
  • Multiple assemblies: 12 to 24 inches between centerlines of piping runs when more than one assembly shares an enclosure
  • Gate valve to enclosure roof: Six inches minimum clearance to allow wrench operation of the valve handwheel, for both OS&Y and NRS gate valve types

Specifying an N-pattern assembly allows for a correspondingly smaller enclosure, reducing cost and site footprint length by 25 percent. Placing multiple assemblies and water meters in a single enclosure can further reduce the total footprint. Use the Safe-T-Cover sizing guide to confirm dimensions before specifying.

clearance (1)

Clearance Requirements Quick Reference

The following clearances are drawn from our Standard Details Guide and ASSE 1060 guidelines. Use these as minimum values when sizing enclosures and positioning assemblies.

Clearance Type
Minimum Dimension
Purpose
Relief valve to concrete pad (RPZ)
12 inches
Prevents submersion; allows drainage
Assembly to enclosure walls
6–12 inches all sides
Test equipment connection to test cocks
Multiple assemblies: centerline to centerline
12–24 inches
Service and maintenance access
Gate valve to enclosure roof
6 inches
Wrench clearance for OS&Y and NRS handwheels
Enclosure to landscaping
36 inches
Unobstructed maintenance and testing access

Backflow Enclosure Installation: Step-by-Step

The following sequence applies to above-ground installation on a reinforced concrete pad. Safe-T-Cover enclosures ship flat with all assembly hardware and instructions included.

Site Selection and Preparation

  • Choose a location that avoids flood-prone low areas and high-traffic zones.
  • Place the assembly near the property line where possible to simplify tester access and eliminate the need to enter the building.
  • Avoid positioning the enclosure at the front entrance; a setback location that moves it out of primary public view reduces aesthetic concerns without compromising access.
  • Confirm local plumbing codes for setback requirements and minimum service clearance.
  • Verify with the water jurisdiction that the above-ground enclosure design is acceptable and request written approval before finalizing the specification.

Concrete Pad and Anchoring

  • Mark anchoring points and the concrete pad position based on the enclosure footprint and assembly dimensions.
  • Confirm all utility locations and underground conflicts before beginning any excavation.
  • Pour a reinforced concrete slab per local structural requirements; use 3/4-inch crushed stone as a sub-base for drainage.
  • Allow concrete to cure fully before setting the enclosure.
  • Anchor the enclosure to the substrate using the specified hardware; proper anchoring deters removal and ensures structural stability.

Positioning and Assembly

  • Center the enclosure over the assembly. Safe-T-Cover enclosures are shipped flat for easy access and field assembly. For example, we assembled this in a parking lot to demonstrate the process.


  • Position the enclosure panels and assemble per the included instructions.
  • Secure all doors and verify lock operation before final anchoring.
  • Label the enclosure exterior with device type, pipe size and testing contact information.


Piping, Mounting and Assembly Integration

  • Align piping to maintain trap primer slopes and proper drainage fall rates.
  • Support piping to prevent mechanical strain on the backflow assembly.
  • Install restraint joints where required (stainless all-thread rods are specified for RPZ assemblies).
  • Orient the backflow prevention assembly with flow direction clearly marked.
  • Confirm all test cocks are accessible through the enclosure opening without removing other panels.

Freeze Protection, Heaters and Insulation

  • For Class I applications, install a heater rated for the local climate. Safe-T-Cover’s patented slab-mounted heater maintains a steady internal temperature and is bolted directly to the concrete. The heat can penetrates down the vertical riser pipes by about 16 inches. A thermostat controls heater activation.
Backflow enclosure details showing heat distribution from a slab-mounted heater
  • Wire the heater to local power per the applicable electrical code
  • Verify thermostat operation and setpoint after wiring is complete


Drainage, Ventilation and Moisture Control

  • Install a code-compliant drain for RPZ relief valve discharge, sized to meet ASSE 1060 Table 3 flow rates for the installed valve diameter. Larger devices require correspondingly higher drainage capacity.
  • Provide passive ventilation to prevent condensation buildup
  • Use a hinged drain flap where appropriate to prevent backflow into the enclosure
  • Seal joints and penetrations to prevent water intrusion from precipitation


Security, Locking and Tamper Resistance

  • Fit tamper-resistant locks. Safe-T-Cover’s LOK-360 system provides tool-resistant access control
  • Use reinforced panels in high-risk commercial applications
  • Confirm the enclosure is anchored to concrete to deter removal

Testing, Commissioning and Maintenance

Initial Certification and Functional Testing

  • Schedule a certified backflow tester for initial certification before the enclosure is closed out.
  • Perform a full leak test and functional test of the assembly.
  • Document test results and attach records inside the enclosure or to the project file.
  • Hand over operation and maintenance instructions to the property owner or facility manager.

Ongoing Inspection and Maintenance Schedule

  • Annual testing of the backflow prevention assembly by a certified tester is required by most jurisdictions.
  • Clean backflow enclosures twice per year to help prevent moisture buildup inside.
  • Inspect enclosure seals, locks and heaters quarterly.
  • Replace corroded hardware on detection; do not defer.
  • Confirm drainage path remains clear at each inspection.

Avoid These Common Installation Mistakes

  • Undersized enclosure: An enclosure that blocks access to test ports will fail inspection. Size to ASSE 1060 clearance minimums, not to the bare physical footprint of the assembly.

  • No drain for RPZ assemblies: Omitting drainage is a code violation and a flood risk. Every RPZ installation requires a compliant drain sized to handle full discharge flow.
  • Improper anchoring: An unanchored enclosure can shift, be moved or be removed entirely. Anchor to concrete with the specified hardware.
  • Vault specification for RPZ assemblies: RPZ assemblies cannot be installed below grade. If a vault is specified for an RPZ, the design is non-compliant by definition.
  • Indoor RPZ installation without drainage planning: Floor drains in mechanical rooms are rarely sized to handle RPZ relief valve discharge for assemblies 2 1/2 inches and larger. Design the drainage system for worst-case discharge, or move the assembly outside.
  • Skipping water jurisdiction approval: Before finalizing an above-ground enclosure specification for a new project, send the design to the water jurisdiction and request written confirmation that it will be approved.

Size Your Enclosure

Now that you know how to install your enclosure, it's time to choose the right one! Use our free sizing guide to select the perfect aluminum cover for your next backflow project.

FAQ

Why is a backflow enclosure important?

A backflow enclosure shields a backflow prevention assembly from freezing conditions, vandalism, physical damage and weather. A properly designed enclosure — one that verifiably meets ASSE 1060 standards — provides protection with standardized performance requirements for structural load, drainage, access, security and temperature control.

Manufacturers offer enclosures in different materials, but marine grade aluminum is the only option that delivers corrosion resistance, 30-plus-year service life and full ASSE 1060 compliance across all pipe diameters. This setup protects critical equipment and prevents contamination of the potable water supply over the long term.

Where should a backflow preventer be installed?

Above ground, outside the building, inside an ASSE 1060-certified enclosure. Underground vaults flood and create cross-connection risks; they also require OSHA confined space entry procedures for every annual test. Indoor installations create flood liability when RPZ relief valves discharge. Above-ground enclosures eliminate both risks.

How do you install a backflow preventer enclosure?

In a nutshell: Prepare a reinforced concrete pad, anchor the enclosure to the substrate using the manufacturer-supplied hardware, integrate piping with proper clearances and supports, install heater and drainage per ASSE 1060 requirements, and schedule initial certification with a licensed backflow tester. Safe-T-Cover enclosures ship flat with all hardware and assembly instructions included.

Should I use a cage instead of an enclosure?

No. Metal cages offer no freeze protection, no ASSE 1060 compliance and no concealment from theft. They expose high-value metal components to the elements and to potential thieves. Due to manufacturing efficiencies, ASSE 1060-compliant aluminum enclosures are now cost-competitive with steel cages when lifecycle cost is considered. Read the full comparison of backflow cage problems.

What is the average cost to install a backflow preventer enclosure?

Installation cost varies significantly based on enclosure size, material, site conditions, local labor rates and whether freeze protection is required. Contact a Safe-T-Cover design engineer for a project-specific quote. We deliver quotes in less than a day.

What ASSE 1060 class do I need?

Class I is the correct choice for any climate with freeze risk and is increasingly the best specification even in warmer regions. Class III provides no freeze protection and Safe-T-Cover does not manufacturer Class III enclosures.

Can multiple backflow assemblies share one enclosure?

Yes. Placing multiple assemblies in a single enclosure is a common approach to reduce total site footprint and are a good example of custom solutions that reduce both cost and visual impact. Most manufacturers offer modular configurations for this purpose. When two or more assemblies share an enclosure, maintain 12 to 24 inches of clearance between centerlines of piping runs to ensure sufficient service and maintenance access.

Can a backflow preventer enclosure protect a water meter?

Yes, a standard backflow enclosure can be sized and designed for water meters. Water meters can also be placed in the same enclosure as a backflow device. Confirm the device type before specifying an enclosure.

Not Sure A Standard Sized Aluminum Enclosure Will Work?

Check out our custom enclosures instead.
We can make them in nearly any size with extra features.